E-Signature
Allow users to authenticate and sign documents digitally
Overview
MetaMap's E-signature allows you to sign legal documents digitally. You can verify your user's identity using their ID documents and biometrics along with getting their digital signature. With MetaMap, you can build a robust E-signature flow that will ensure that the person who signs your legal document is the person who should be signing it.
Availabity
🌎 Available globally
Features
-
If you use our SDK or direct link, users will be shown a screen where they can view up to 5 legal documents before typing their name and (optionally) touch signing with their signature.View and sign legal document(s) -
Use custom variables to customize the terms and services your users agree to, or highlight specific data in a document. The custom variables appear as an appended page at the end the signed document.Append custom variables to a legal document -
When enabled, MetaMap will check that your user's typed name matches their full name in their ID document.Check user name against ID document or a name you specify
Alternatively, you can specify the name you expect your user to sign when you send them the MetaMap button. -
When enabled, MetaMap will check that your user's selfie photo or video match the user's photo in their ID document.Check selfie against ID document -
MetaMap's E-signature product can be enhanced by combining it with authenticity checks like geolocation, e-mail ownership, phone number ownership, and biometric liveness.Enhanced authenticity checks -
MetaMap will provide a PDF of the signed document in the dashboard which will include (* if enabled):Download signed document- Read timestamp
- Sign timestamp
- Biometric data *
- Scanned ID document *
- ID document scan values *
- Telephone number ownership check *
- E-mail ownership check *
- IP and geolocation check *
- Custom variables
- Touch signature image *
Custom Variables
You can add custom variables to your documents to specify or highlight your user's information and terms when your user is ready to sign.
Custom variables are a type of metadata that will appear in the contract document(s). You add the metadata to either your direct link or to your MetaMap button . The custom variable metadata has the following format:
{
  "eSignature": {
    "customVariables": {
      "<variable key>": {
        "title": "<variable title>",
        "value": "<variable value>",
        "documents": [
          "<document1 ID>",
          "<document2 ID>"
        ]
      }
    }
  }
}
| Parameter | Required | Description |
|---|---|---|
<variable key> | An alphanumeric [a-z, A-Z, 0-9] string that links the information to your internal systems. | |
title | The string that the user sees that specifies the contract term name. Max length of 50 characters. | |
value | The string that specifies the contract term. Max length of 50 characters. | |
<document ID > | The specific document(s) associated with the variable key, up to 20 documents. You can copy the document ID from your metamap in the E-Signature configuration: |

The following example with variable keys carMake and carModel:
{
  "eSignature":{
  "customVariables":{
    "carMake":{
      "title":"Car Make",
      "value":"Toyota"
    },"carModel":{
      "title":"Car Model",
      "value":"Camry"
    }
  }
}
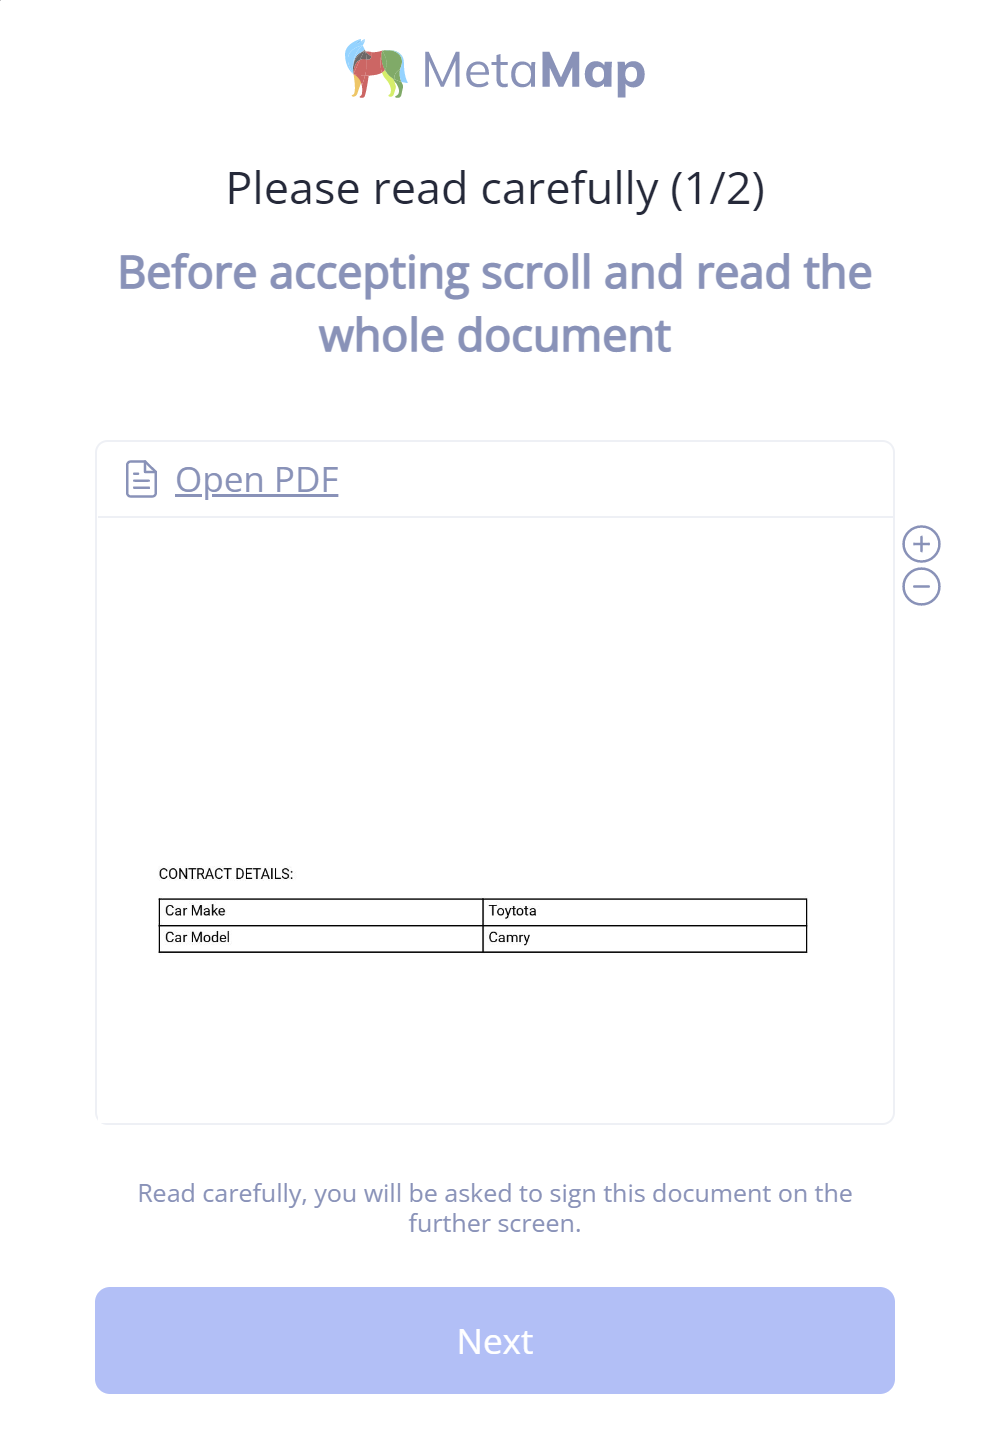
would appear to appended to each uploaded document as a table appended to the contract as an extra page:
Key Metrics
<3 minutes to confirm users
User flow
In order to pass the E-signature step of your metamap, your user has to read (scroll down) the document, type their name, and if enabled, pass biometric and document verification.
Signature Methods
The E-signature product there has three types of configurations or "Signature Methods":
Here's what your users will see for each Signature Method if you use MetaMap's prebuilt UX:
Name
The Name Signature requires your user to view the legal document and type in their name, and (optionally) touch sign the document.
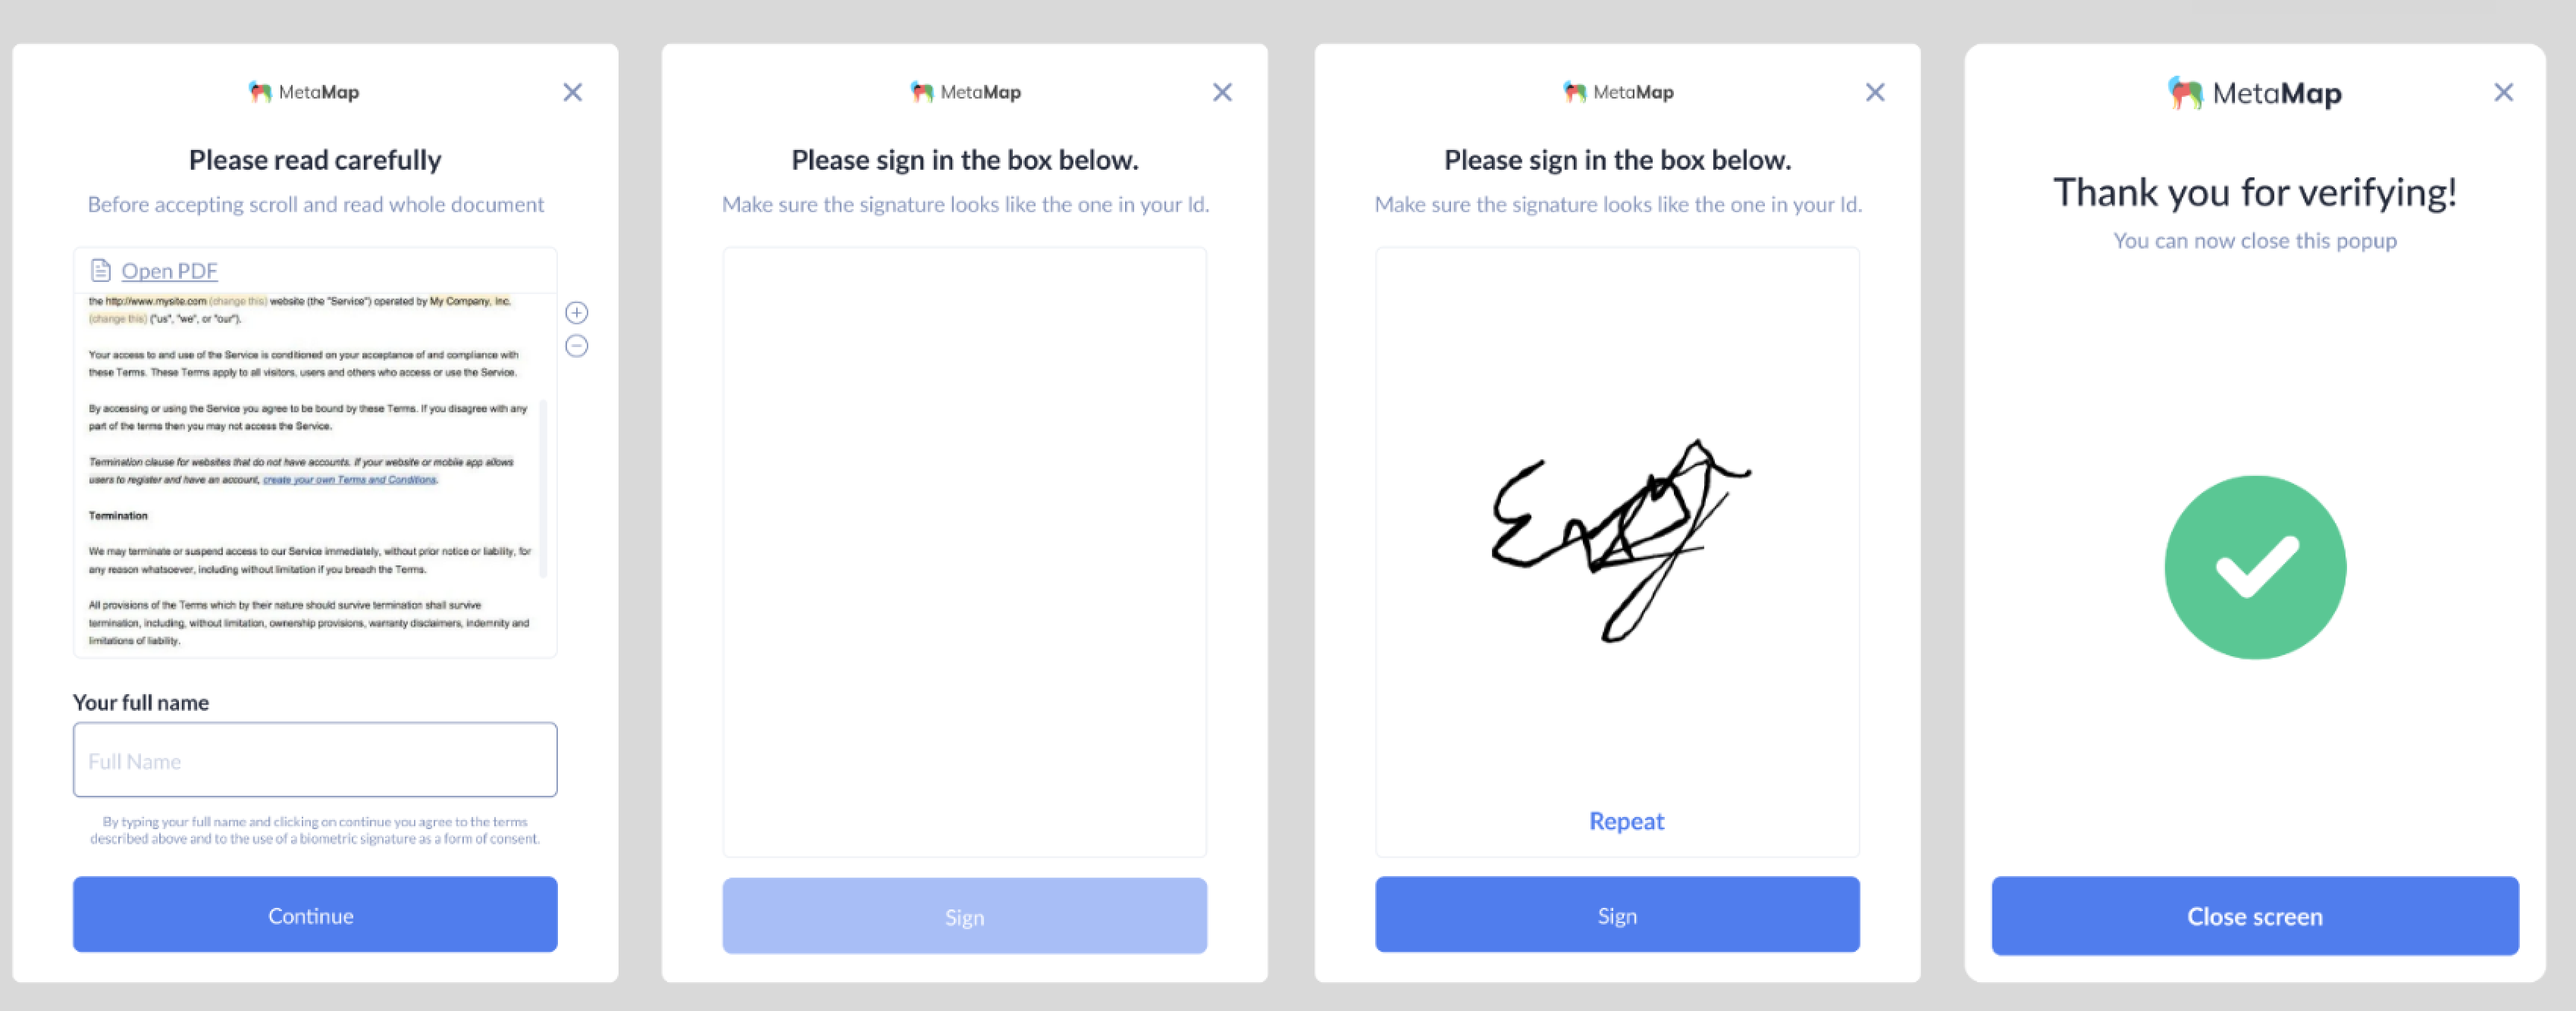
4 screenshots showing the E-Signature process, including user agreement with user name, touch sign prompt, signed touch sign prompt, and process completion.
ID Document and Name
The ID Document and Typed Name Signature requires your user to:
- Upload an ID document with their name and date of birth
- View the legal document and type in their name , and (optionally) touch sign the document.

8 screenshots showing the E-Signature process, including start document upload, country selection, document selection, document upload, user agreement, user agreement with user name, and process completion.
Face, ID Document, and Name
The Face, Document, and Name Signature requires your user to:
- Upload a national ID with name and date of birth
- Take a selfie photo or video
- View the contract and type in their name, and (optionally) touch sign the document.

10 screenshots showing the E-Signature process, including start document upload, country selection, document selection, document upload, selfie, user agreement, user agreement with typed user signature, and process completion.
How it works
If a user passes the E-signature step and any optional Biometric or Document Verification checks, they will be "Verified". If the user fails these checks, they will be marked as "Review Needed".

Setup
There are 3 main steps to set up E-Signature:
- Setup your metamap on the dashboard
- Integrate or use MetaMap's Direct Link
- Process verification results
Step 1: Setup a Metamap
The first step to setting up E-Signature is to create a new metamap in the Dashboard. Once you've created a new metamap, add the E-Signature product to the user flow.
Verification flow setup for each Signature Method:
.png")
The E-Signature product added to a metamap in the dashboard
Name Signature Setup
Implement this Signature Method if you want to allow your user to sign a legal document digitally by typing their full name and (optionally) touch signing.
To implement this:
- Login to the dashboard, and create a Verification Flow
- In your metamap, add the E-Signature product
- Update the E-Signature product configuration in the right hand panel
- Turn on the "Enable E-Signature" toggle
- "Name Typing" will be selected as the default "Signature method"
- (optional) Toggle "Require touch sign" to have the user draw their signature
- Under "Terms to Agree to", upload up to 5 documents that your users will have to read before signing
- Click "Save" and your flow is ready to use
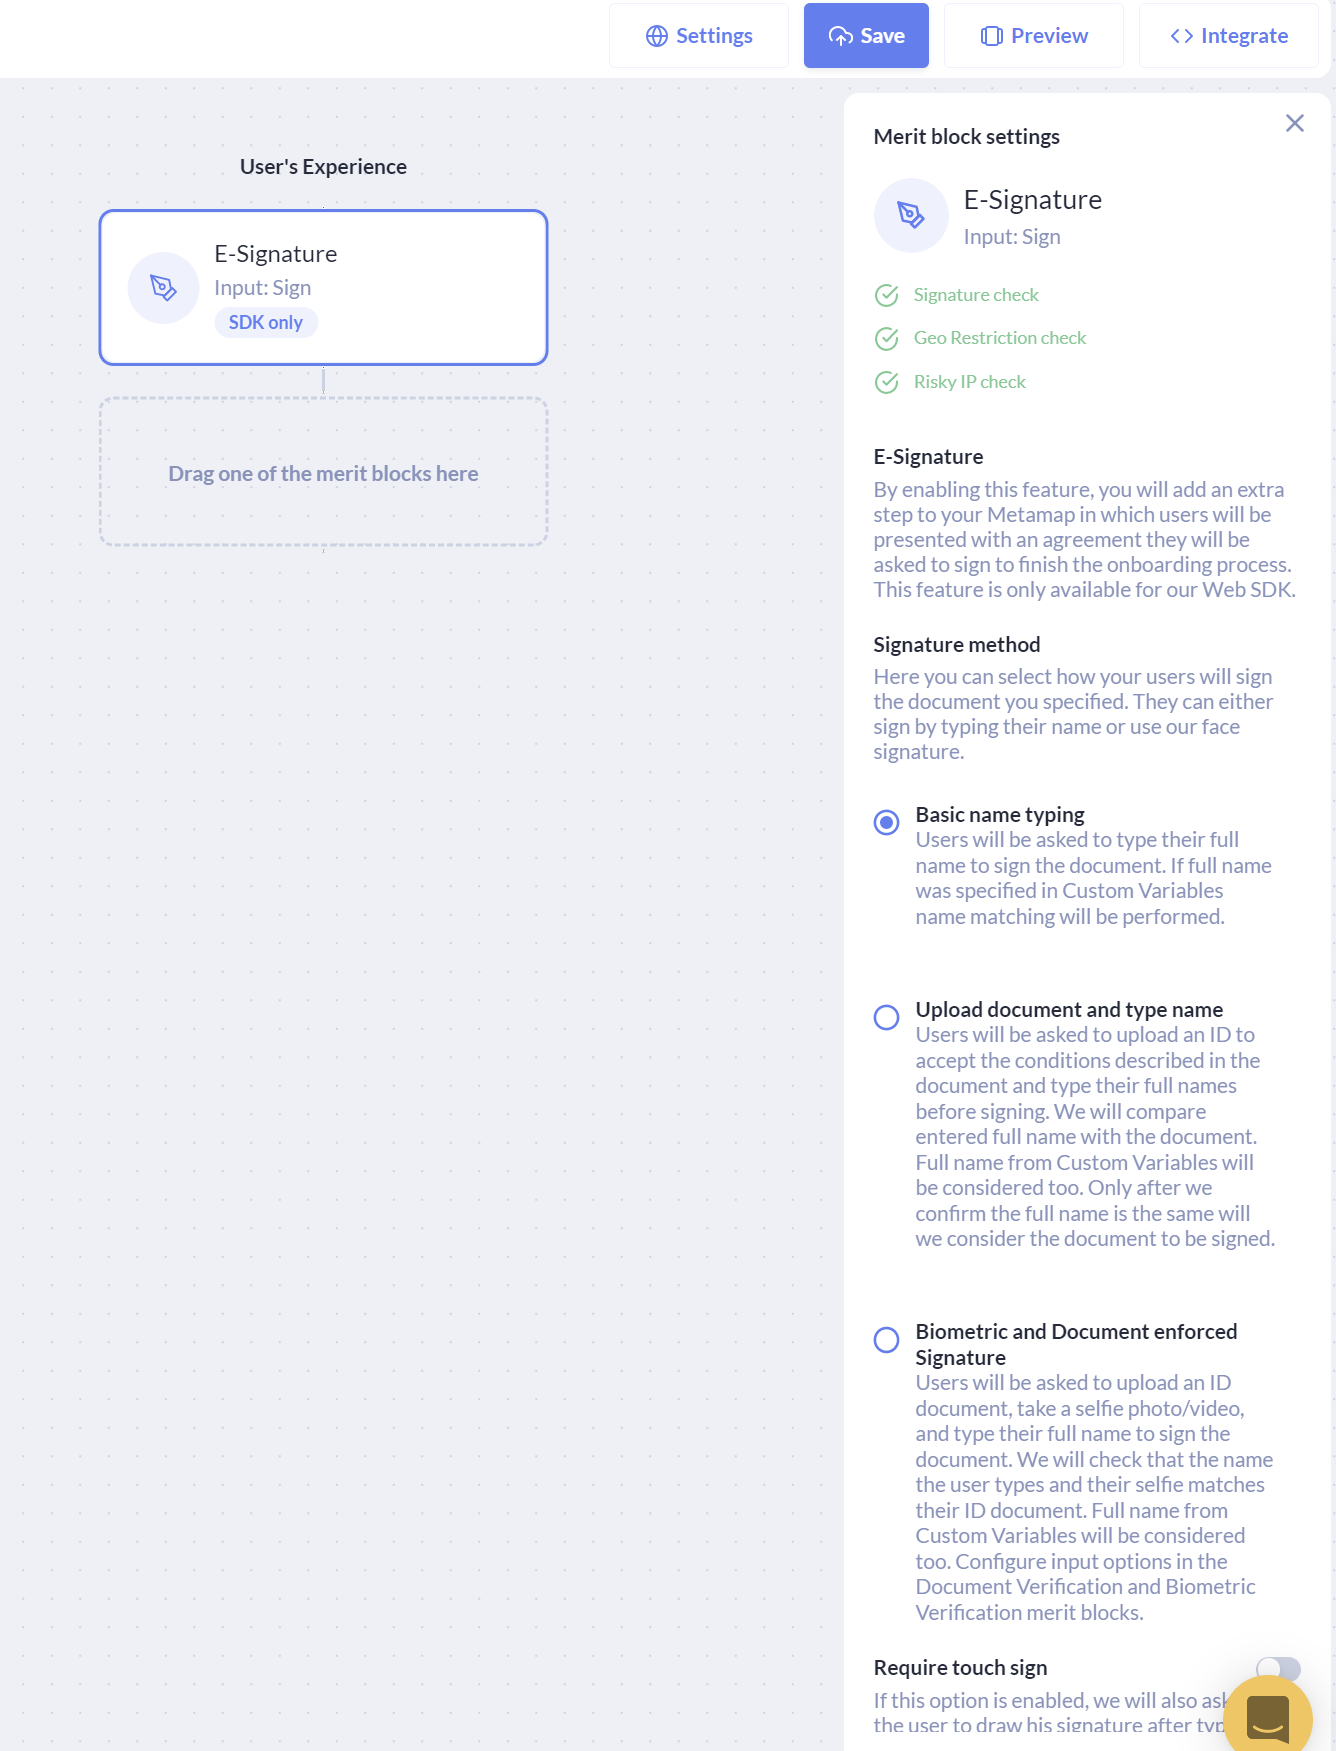
Dashboard user flow with E-Signature, and the selection of signature type: basic name typing.
Document and Name Signature Setup
Implement this Signature Method if you want to verify that the user's typed name matches their uploaded ID document.
To implement this:
- Login to the dashboard, and create a Verification Flow
- In your metamap, add the E-Signature product
- Update the E-Signature product configuration in the right hand panel
- Turn on the "Enable E-Signature" toggle
- "Name Typing" will be selected as the default "Signature method"
- (optional) Toggle "Require touch sign" to have the user draw their signature
- Under "Terms to Agree to", upload up to 5 documents that your users will have to read before signing
- Add the Document Verification product to your metamap
- Update the Document Verification product configuration in the right hand panel
- Select "Selfie Photo" or "Selfie Video"
- Click "Save" and your flow is ready to use
.png")
Dashboard user flow with Document Verification and E-Signature, and the selection of signature type: name, and selfie and name.
Face, Document, and Name Signature Setup
Implement this Signature Method if you want to verify that the user's typed name matches their uploaded ID document, and that their selfie photo matches their ID document photo.
To implement this:
- Login to the dashboard, and create a Verification Flow
- In your metamap, add the E-Signature product
- Update the E-Signature product configuration in the right hand panel
- Turn on the "Enable E-Signature" toggle
- Change the "Signature method" to "Face and Document Signature", and in the modal that appears, select "Add this product"
- (optional) Toggle "Require touch sign" to have the user draw their signature
- Under "Terms to Agree to", upload up to 5 documents that your users will have to read before signing
- Update the Document Verification product configuration in the right hand panel
- Select "Selfie Photo" or "Selfie Video"
- Click "Save" and your flow is ready to use
.png")
Dashboard user flow with Document Verification, Biometric Verification, and E-Signature. The signature types include: name, and selfie and name.
Supplemental checks
You can also add supplemental checks to your E-signature metamap:
IP check
Add IP check to your metamap, and we will verify that the user's geolocation makes the user eligible to sign this document digitally.
Your user doesn't need to enter any additional information for this check.
Liveness check
Add Biometric Verification to your metamap, and configure it for "video selfie" to enable this check. We will verify that the user is a live human to reduce fraud.
Your user needs to record a selfie video for this check.
Phone check
Add Phone Check to your metamap, and we will verify that the user owns the phone number that they input.
Your user needs to input their phone number for this check.
Email check
Add Email Check to your metamap, and we will verify that the user owns the email address that they input.
You user needs to input their email for this check.
Step 2: Integrate
There are 3 ways you can use MetaMap's E-signature:
- Direct Link — Send your users a link to sign documents on MetaMap's prebuilt UX
- Metamap Button Button — Integrate our MetaMap Button SDK into your application to use our prebuilt UX
Direct Link
If you are not a developer, or you don't have the resources to integrate at this time, you can start using MetaMap's E-Signature product in minutes without any code with our Direct Link.
To implement this:
-
Setup the metamap for E-Signature in the dashboard
-
Get the Direct Link
(optional) Specify a signed name (nameMatching) and/or append metadata (customVariables) to your direct link.
The following example appends both a signed name and metadata:{ "eSignature":{ "nameMatching":{ "fullName": "JOHN DOE"}, "customVariables":{ "carMake":{ "title":"Car Make", "value":"Toyota" },"carModel":{ "title":"Car Model", "value":"Camry" } } } }You would append the following reformatted JSON to your direct link:
&metadata={"eSignature"::{"nameMatching":{"fullName":"JOHN DOE"}, "customVariables":{"carMake":{"title":"Car%20Make%20","value":"Toytota%20"},"carModel":{"title":"Car%20Model%20","value":"Camry%20"}}}}You can also our example at CodePen.io.
-
Send the Direct Link to your users
Integrate our MetaMap Button via SDK
Use our SDK integration if you want to use MetaMap's verification tools but design your own E-Signature experience for your users.
To implement this:
-
Setup the metamap for E-Signature in the dashboard
-
Install and implement an SDK framework
(optional) Specify a signed name (nameMatching) and/or append metadata (customVariables) to your direct link.
The following example appends both a signed name and metadata:{ "eSignature":{ "nameMatching":{ "fullName": "JOHN DOE" }, "customVariables":{ "carMake":{ "title":"Car Make", "value":"Toyota" },"carModel":{ "title":"Car Model", "value":"Camry" } } } }would look like the following example in our Web SDK:
<script src="https://web-button.getmati.com/button.js">
  </script>
  <mati-button
    clientid="<client_id>"
    flowId="<client_secret>"
		metadata='{
        "eSignature":{
          "nameMatching":{
              "fullName": "JOHN DOE"
              },
          "customVariables":{
            "carMake":{
              "title":"Car Make",
              "value":"Toyota"
            },"carModel":{
              "title":"Car Model",
              "value":"Camry"
            }
          }
        }
      }' />
Integrate via API
Use our API Integration if you want to use MetaMap's verification tools but design your own E-Signature experience for your users.
To implement this:
-
Setup the metamap for E-Signature in the dashboard and get the Flow ID
-
Send a request to the Authentication endpoint to get an authentication token
-
Pass your Flow ID into the Create Verification to get the verification
idand theinputs -
When your user signs the document in your application, pass your verification
idandinputsonto this endpointcurl --location 'https://api.getmati.com/v2/verifications/{{verificationId}}/inputs/electronic-signature-with-full-name' \ --header 'Authorization: Bearer {{access_token}}' \ --header 'Content-Type: application/json' \ --data '{ "data": { "fullName": "JOHN DOE", "readDetails": [ { "documentId": "{{documentId}}", "readAt": "2023-04-01T00:00:00.000Z" } ], "signedAt": "2023-04-01T00:00:00.000Z" } }'Variable Type Description access_token String The access token obtained from the Get API Authorization Token API call verificationId String The ID of the verification that you created using the Create Identity API call data Object An object that contains the information needed for the verification. The information can include any fields that you want to include in the verification. The data object should include the following keys:
data.fullName: The full name of the person who will sign the documentdata.readDetails: An array of objects that contains information about the documents that the person has read. Note that multiple documents can be signed simultaneously by the user.- Each object should have two properties:
documentId: which is the ID of the document that the person has read, note that this value can be obtained from our dashboard when uploading PDF documents in a metamap.
[block:image]
{
"images": [
{
"image": [
"https://files.readme.io/4a1d9c0-image.png",
null,
null
],
"align": "center",
"sizing": "300px"
}
]
}
[/block]readAt: which is the date and time when the person read the document.
- Each object should have two properties:
data.signedAt: The date and time when the person signed the document. This should be in ISO 8601 format (e.g., 2023-04-01T00:00:00.000Z)
Step 3: Process verification results
E-signature verification checks will result in a "Verified" or "Review Needed" status. E-signature checks will never result in a "Rejected" status.
There are two ways you can process verification results for E-signatures:
- In the Dashboard
- Using Webhooks
Dashboard Verification Results
In the dashboard, visit the Verifications tab, and click on a Verification to review the results and download the signed document. These are the checks that indicate whether or not a user has passed an E-signature verification:
- Verification Status: Verified/ Review Needed
- Facematch with Selfie: Passed/ Failed
- Namematch with ID Document: Passed/ Failed
- E-Signature Results

Screenshot with example downloadable signed user agreement.
Webhook verification results
To handle the webhook responses that will be sent to your webhook URL, you will need to configure your webhooks.
If you have enabled touch sign, the signature image will be included in an additional file.
The following webhook corresponds with the E-Signature merit:
Updated over 1 year ago